.

Friday, December 21, 2007

Fun Pages From Hawaii


When I scrapbook I love trying new things. At first I didn't want to cut my pictures, I wanted to follow all the rules for scrapbooking to a 'T'. Then I loosened up and realized that I don't have to be such a perfectionist. The more fun I made the pages the more my son Ben loved looking at them. The pages that were done formatted perfectly he just glanced at them and that was all the attention they deserved. Seeing this in Ben I started to really use my creativity to produce pages that he would look at over and over againg because that time is so precious to me and we share a passion for family pictures. When I was little I would pull out all the family albums about once per month and glance through them - I was the only one out of 5 that would even look at the pictures. Well it seems that Ben loves to do this too and now we share many moments together going through all the scrapbooks. I love this time, I cherish this time because I know that it will not last forever.
Have fun with your pictures, experiment, cut, distress, color, enjoy!
Happy Creating everyone!
Thursday, December 20, 2007

Mosaic Scrapbook Pages


As promised from my last post here are my mosaic scrapbook pages. I love making pages like this because my creative juices begin to flow. The funny thing about these pages are that the pictures are both from Hawaii though taken 13 years apart. (I waited a long time to go back to Hawaii and I can't wait to go back again!) The full "Ocean" mosaic page is from a template I used about four years ago from a Scrapbooking book published around that time. I do not have the book as I borrowed it, however... the template is actually easy to plan out if you choose say five different underwater animals - an Octopus, a starfish, a seahorse, a fish, and a dolphin. Draw these out on a 12x12 scrap sheet. Then from those images working outward to the outer edges of the page draw different shapes around these images (making sure you leave enough room for space between each piece you put down). Once you have your complete page drawn, separate images of underwater creatures with lines, now number each piece. Use this sheet as your template. I have seen this done with swimming pictures of your kids and it looks awesome.

The less complicated mosaic was the most simple. I basically cut out shapes as I was watching a movie with my kidlets and placed them next to each other cropping where I needed to to ensure the pieces fit into the spaces around the two main photos. Mosaics add so much beauty to your pages - not the most conventional way of scrapbooking but I'm not a very conventional person - LOL.
Happy creating everyone!

Wednesday, December 19, 2007

Kaleidescoping With Ben and Josh


On our anniversary in October my husband and I went walking around this area of town with some art shops, with our Starbucks of course! We went into this one store and I discovered these amazing Kaleidescopes that were so beautiful as they changed colors that I almost teared up. You see I love color and I LOVE Kaleidescopes! Now that I have found this program; from www.kaleidescopekreator.com I am going crazy with all our pictures. The boys love it too. On the picture of a bee on a dandelion I didn't realize that I had already changed the picture in Adope Photoshop so it is a little distorted, but I think it gives it even more character. I have seen some flowers done with this program and they make the most exsquisite kaleidescopes. I can't wait to make an entire scrapbook of kaleidescope pictures.
I am not a conventional scrapbooker really. I like to make it a little different or give it an artistic flair. I am not at all afraid to cut up my pictures to make them into a mosaic scrapbook page. Actually I think I will post one of them next time. In the mean time I hope you enjoy these fun little pics.
Happy creating everyone.

Friday, December 14, 2007

Kaleidescope Kreator


Over at Allison's "Stamping When I Can" blog, Tutorials... I discovered a tutorial on Kaleidescope Kreator and I so enjoyed it that I purchased the program. What a fun way to scrapbook pictures! I am all finished with my Christmas cards and so my mind is turning to all the digital pictures stored on my computer that have yet to be scrapbooked. I have a long way to go before I will be caught up... I'm talking thousand's of pictures. Even though I have about 6 scrapbooks already done I still have many pictures needing a home.
A few years back a girlfriend of mine showed me one of her books on scrapbooking and this technique (making a kaleidescope with your pictures) was in it. However, at the time there was no digital program for your pictures that would automatically print them out like that. So... if you wanted to create this effect you would have to print out many copies and then use a manual template to cut around each picture precisely - OY VAY what a lot of work that would have been. I am so glad I ran into this program today, now this is what I call easy and beautiful.
Happy Creating Everyone!

Wednesday, December 12, 2007

Jesus Is The Reason For The Season Cards


"Jesus Is The Reason For The Season" stamp is from "All God's Children" stampset from Stampin-up... I'm not certain if it is still available. I use many of the stamps from this set for Sunday school. I'm still trying to make enough cards to give out this year and I am getting there. The hard part is writing out messages for all cards and addressing the envelopes. OY VAY! I get writers cramp after doing only 25 or so! My uncle sent me a card this year and he put it through his printer with messages for everyone - he has really bad arthritus and cannot write out all his cards. You can't exactly do that with handmade cards unless you put it through your printer before you have embellished the cards. That might be a good thing to keep in mind for next year.
For these cards I used some of my left over scraps from my Michael's Christmas Slab paper. I also ran it through my cuddlebug to emboss the circles in the background. I love that simple little machine but I must admit it does hurt my wrist after awhile, only because I am making so many cards! Well enjoy the cards!
Happy creating everyone!

Monday, December 10, 2007

Merry Snowman Nativity


I'm still trying to make my 70 cards for our family to send out and I am up to 54. I am making an assortment instead of making them all the "JOY" card I said yesterday. No... I didn't make all of the 54 today, I had 29 left over from the fundraiser. My mind is going crazy trying to think of all different kinds of cards. I love this snowman nativity so I made 5 of these cards. I am still using up some of my Michael's Christmas Slab scrapbook paper. I didn't know what I was going to do with this blue poka-dot paper as I'm not a huge fan of blue. I don't know why... I guess some people are blue people and some people are not. I am not. I think I am more of an olive green person.
Still enjoying the Nestabilities and particularily the scalloped circles. I have made many cards with these and have really liked all of them. Once again this stamp is from my "Nativity Snowman" stamp set from TAC (The Angel Company), the 'Merry' is from Stampin Up.
Happy Creating Everyone!

Sunday, December 9, 2007

Interesting Tree Card With Cuddlebug


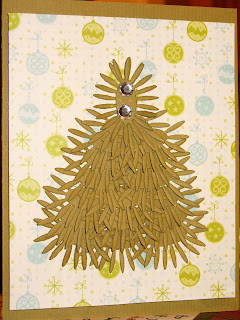
I purchased an alphabet for my Cuddlebug months ago and with each alphabet there are usually some extra die cuts after the numbers... on this particular alphabet there is a half view of a flower, kind of like a daisy. I haven't used it until this card. As I was looking at the picture on the die cut I realized that the pedals looked a little bit like pine needles so I put it through the cuddlebug and then turned the image upside down... then put it through the cuddlebug about 20 more times and continued layering this upside down flower. I used approximately 18 flowers for each card (which is alot of rolling through the cuddlebug) as I wanted to make it really full. I think it turned out pretty cute though my wrists are somewhat sore - LOL. Was it worth it? Definitely!
Happy Creating Everyone!

My Christmas Card This Year


After making 101 different kind of cards for the Christmas Kid's Ministry Fundraiser this year I am finally free to sit down and make some cards for us. I only have to make 70 or so! Yikes. I have tried to make a simple design and this one is fun and not too difficult. I get to use my cuddle bug and that's where the fun comes in. The tags and the letters are from my alphabet for the cuddlebug. The glitter is from Making Memories. I love the fact that the Cuddlebug can cut right through felt and foam and chipboard... that is why it makes this card so relatively easy. Well I hope you like it everyone.
Happy Creating!

Saturday, December 8, 2007

Wine Glass Centerpieces


I did not like the previous glasses with that puny ribbon so I went out to Michael's just in time for their 50%off sale of ribbon. I really like the centerpieces now. They fill out the bottom of the glasses much better. They still had a wonderful selection to choose from which surprised me as it is so close to Christmas, I took advantage of it and purchased 4 rolls.
Let me know if you like these ones better.
Happy Creating Everyone!

Thursday, December 6, 2007

Wineglass Centerpieces


I saw these on a website while looking for napkin folds and later I lost the web address for them (sorry). These simple centerpieces were made with wine glasses, tealights, beading wire, glass beads rocks, and ribbon.
To make them I cut 2 pieces beading wire approx. 28cm in length. Then I used a glass bead and beaded it onto one of the wires. Placing the wires side by side and finding the middle, I twisted the two pieces together to make four sides of wire. At each end I used my wire pliers to curve them into circles which will hold the tealight, then I did this to all four sides. I threw some glass bead rocks into the bottom of the wine glasses. Then placed the wire into the glass using my fingers to flatten out the middle where the tealight will go. Then I placed the tealight in. I also tied ribbon around the base of each glass, but I am thinking I want to change the ribbon to a thicker size and more vibrant red as I think they will look much richer in design. These were unique and fun to make. Let me know if you give them a try.
Happy creating everyone.

Werthers Christmas Tree


Who doesn't love Werther's Melt-in-your-mouth caramel candies? I made this "Werther's" Christmas tree this year for a door prize at the Men's Ministry Evening I am hosting with my husband. I remember making one about ten years ago using all sorts of different colored candies. That makes a beautiful tree as well. They are really simple to make, all you need are some pins, a styrofoam cone, candies and some ribbon.
I purchased the cone at Michael's. Starting at the bottom of the cone I began pinning each candy around the cone until I got to the very top. Once finished filling the tree with candy, I went back and cut small pieces of ribbon and pinned them in various places around the tree. I used Emerald Green and Burgandy ribbon for this. On the top I used an irridescent wired ribbon to make the beautiful bow at the top of the tree by pinning each layer of the bow. This always makes a wonderful giveaway that can be shared at Christmas time.
Happy Creating everyone!

Lotus Flower Napkins For Christmas


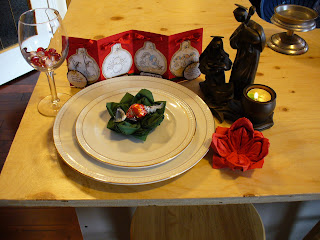
As promised yesterday, here are the beautiful Lotus Flower Origami Folded Napkins. I am hosting a Mens Ministry Christmas Get Together at our Church and I was looking online for some decorating ideas and I came across different ways to fold the napkins for the tables. Of course you can't really use these as a napkin, but them make beautiful additions to the plates on the table. I put a Lindt Chocolate in the center of each one. The wine glass filled with little glass pieces is another project I am working on... which I will post at a later date (once finished)
They were really easy to learn and easy to fold, although they look difficult. I found a video tutorial at the following link. You will have to copy and past the link into your browser.
www.luv2help.com/origami-video-tutorials/
Look at the Lotus Flower.
I tried to add it as a video and unfortunately I am technologically challenged obviously because I could not get it to work!
I hope you enjoy them.
Happy creating everyone!

Wednesday, December 5, 2007

New Christmas Toys & Idea


Decorating your door for Christmas!
I got this idea from our Realtor a few years ago but never managed to do this to my door. She did her bathroom door and her closet doors and I loved the idea. I purchased this amazing ribbon from Costco for $11.99 and I had to think of something to do with it, and that is when this idea came to the front of my brain. I wrapped it around length wise and then stapled it to the top of the door (where no-one can see), then I did the same thing width wise. I actually sewed the bow together and then sewed it onto the ribbon on the door (because I didn't want to staple the front of our door). Then I puffed up the bow to look pretty.
Next...
I purchased this adorable Santa on the ladder at Costco today. Can you tell where I like to shop??? Santa moves up and down the ladder with a string of lights over his shoulder and his sleigh (which goes at the bottom of the ladder) plays a beautiful Christmas bells song. It was only $34.99 which I think is a pretty good deal. We usually purchase one new Christmas gadget per year and I thought this would be a perfect addition for beside our tree.
Well, happy creating everyone! Tomorrow I will be posting these beautiful Lotus paper napkin (origami)to put on your Christmas Table so stay tuned!

Friday, November 30, 2007

Nativity and 'Politically Correct' Cards


I really love my new Nativity stamp set from Stampin up. I have made a number of different cards with it already this year and have loved everyone of them. Now that I have my Nestabilities (as well as understand the 'concept' of Nesting - duh!) I am using them with all sorts of colors and layers. I have found that they add so much depth to an otherwise plain card. I am still making my way through some of my Christmas scrap paper that I purchased this year, so I have had a lot of fun piecing different schemes together.

Ah... I love the Christmas tree on this next card. I borrowed it while playing at my girlfriend Nancy's house one day and I still have yet to use all the images I stamped with it. It reminds me of a 'fuller' version of a Charlie Brown Christmas tree. While she and I went shopping that day we ran into this series of stamps at Paper Pastimes - apparently the company that made this stamp put's out a new line of stamps at Christmas and have special discounts on specific sets and with each purchase they provide you with pictures of sample cards that have been made with them. The name is on the tip of my tongue... nope... it's gone. Hop on by Nancy's blog (Nancy's Creative Mess in my 'cool links') as she is really good at remembering names and I am certain she has posted the name of the company that made this stamp on her blog. I have a fellow at Church that wanted me to make a plain Christmas card with no sayings in it so not to offend anyone. I do not wish to offend anyone either. I like the simplicity of this card though I would love to put a 'Merry Christmas' or 'Christmas Blessings' on it of some sort.
Well, thanks again for stopping by.
Happy creating everyone!

Artsy-Bella


Wow - I can't believe it has been a whole week since I posted last. What have I been doing? Hmmm... let me see... Friday night was 'Movie Night' at our Church and we watched Ratatouiie, Saturday was... Randy painted at the Church and I spent the day with the boys just hanging out, we went to see the movie Enchanted which was awesome. Saturday night was Youth night. Sunday was Church, then Sunday School potluck, Monday - can't remember, Tuesday was lunch with some friends and shopping, then parent teacher interviews... Wednesday I spent all day with Randy as he had the day off... ah yes then the boys got out early on Thursday and they had no school today! Wow, a week really does fly by.
I managed to have some 'play' time today and decided I wanted to make some Christmas cards for my 'artsy' friends. What better time to use my Artsy-bella stamp from Stamping Bella than now. I enjoyed piecing a funky outfit together for these gals. It was a little tricky using this for a Christmas card because it isn't really intended for one, but the shimmering ribbon adds a 'Christmasy' feel, I think it does anyway. I couldn't give it to everyone on my list though I know exactly the friends that will appreciate this card.
Thanks for stopping by my blog. Please leave a comment so that I know who stopped by.
Happy Creating!

Friday, November 23, 2007

It's-a-bella Cute Baby Shower Cards


Teddy-a-bella is such a cute stamp! I created these two cards this afternoon while watching my movie "Material Girls" and half listening to my son's computer playing 'Myth Busters', something about hot chili sauce and milk, and scaring elephants with little white mice (boys are a strange creature aren't they????) Lol. I have four friends having babies within the next year so I figured some shower cards might come in handy. Since I am selling the cards this year at Church chances that someone is throwing a shower for one of them is highly plausable, I think they will sell quite nicely.
Bella stamps are awesome because I can be creative with the outfits the images are wearing - it's almost like dressing a paper doll! How fun is that??? That was exactly what I was doing while watching my movie this afternoon, stamping mini-images of a pregnant outfit and cutting and pasting them on the image. As I've mentioned before I would love to have all the Bella images, but I don't want to be greedy!
Well, happy creating everyone! Enjoy the rest of your weekend.

Thursday, November 22, 2007

Nestabilities and New Scrapbook Paper... Aaaahhh!


What can be better than watching an old musical and making cards in the afternoon?

While watching "Singing In The Rain" for the first time ever, I managed to make these three cards using my new scrapbook paper (from Costco) and nestabilities die cuts. I love the layering effect of the nestabilities as well as the colors of the paper.
I always enjoy adding bling to my cards, as "bling" is the new "thing" for cards and well everything it seems. I'll just stick to bling for my cards thank you very much! It's rather funny that I picked up some bling gems from Future shop - they are originally intended for your cell phone. LOL. What do you need bling on your cell phone for anyway???
These cards were relatively simple to make by just layering the different colors of paper and the diecut shapes. The bottom strip I rounded off one side with my corner punch and added a gemmed brad. Nice effect I think. I remember just a couple months ago I was using my fiskars circle cutter to make circles, now I just run through them with my nestabilities and cuddlebug and voila!!! Sooooooo cool!
I am having fun.
Well, happy creating everyone! Thanks for stopping by.

Happy Cards


I went to Costco yesterday with the 'love of my life' and I just happen to walk down the stationary aisle... have you been down the stationary aisle lately? To my wonderful surprise I discovered the most beautiful scrapbook paper all packaged nice and neat in a 12x12 "pink" or "blue" box. What is so wonderful about this paper, you might ask? For $19.99 you get over 300 sheets and the patterns are exquisite! The most beautiful designs and in multiple color schemes. They are not double sided or as thick as some scrapbook paper, but I don't mind that at all. I was in my glory, and mentioned this to my husband and boys many times yesterday! By the end of the night, before I even spoke a word they would all say in unison, "YES MOM, WE KNOW... YOU LOVE YOUR PAPER!" Lol. I guess I had a smile on my face the entire evening, and oh ya... did I mention "I love my scrapbook paper"?
These cards are made with three different sheets of that gorgeous paper. The flowers on this particular pattern just happen to match a flower punch I got last month (by Martha Stewart Designs) and so I was able to punch out a smaller flower for the larger flower image shown on the paper. It worked out rather nicely if I do say so myself. I used my cuttlebug to cut out the letters. I am really enjoying my new discoveries lately.
Well everyone, happy creating... thanks for stopping by.

Monday, November 19, 2007

Circle's, Circle's, Circle's... Cards


I am having fun with my Nestabilities now that I am feeling well enough to use them. I wanted to create a card that had lot's of circles in different layers and this is what came out of it. I had to make a template for the circles and this was not exactly an easy process in making them all line up accordingly... in fact it was pretty much darn near impossible for me which you can see on some of the circles.
I like cards with lot's of detail but not too difficult to do and cards that are different, not just the 4 1/4" x 5 1/2" size. (although I still like making the usual cards too)
I saw a card with a similar idea on Splitcoast Stampers, www.splitcoaststampers.com, in which there were little windows on the front, and then those windows were layered with more windows and in the background were little Christmas images. It was so cute I had to make something like that. As you can probably gather from my previous cards, I am a huge Nativity nut. Those are my favorite cards to make.
Well I hope you enjoy these cards.
Happy Creating!

Cool New Tatt's


My son Joshua came home from school with a tattoo on his arm (temporary of coarse), the artist in me sprung to the surface the second I saw it! I thought it was the coolest image and I wanted to do one right away. What it is, is this...
1. You draw your name in capital letters JOSHUA (eg)with all letters touching each other.
2. Next write the name again but going backwards from right to left over top of the front way.
3. Then you draw a line through the middle, and then an X through the entire image like you are crossing it out.
4. Now you go outline the outside of the image with a black marker (washable ofcoarse)and then outline the inside white marks to achieve the finished look.

Pretty cool huh? I loved them. I now have three; one I did of my name, one Josh did on my right arm that say's "Daddy's Girl" (?), and then Ben drew "I Love You" on my left arm. Basically my whole family is covered in tattoos! How fun is that? Give it a try, I'm sure you will have lot's of fun!
Happy creating!

Friday, November 16, 2007

Nestability and Cuddle Bug Fun


As noted from my previous entry, I received my "Nestability" order this week and was able to make a few cards, little goodies. I love Christmas Crafts and so I will usually make up some different things other than just cards, so... while staring at my new 'scalloped small circle' Nestabilities and my Cuddle-bug, I decided to make up a Christmas gift-tag package. I love the stamp set that I got called "Snowman Nativity" from TAC. I stamped only the faces of Mary and Jesus on the smallest scalloped circle (with white cardstock), then layered it with the one size up scalloped circle on my "Michael's" Christmas Slab paper. Placed both circles on red cardstock, cut a piece of another colored Christmas slab paper and voila - there became the basis for my tags.
For the package I used 6x6 refill of scrapbooking page protectors, cut off the strip with the holes for placing in your scrapbook, then taped it onto a piece of cardstock approximately two inches longer than the top of the refill sheet where I score a line in the cardstock. Once folded down I can now decorate to my hearts delight. I used One large scalloped circle die cut (on Michael's Christmas Slab scrap paper) and two small scalloped layers with the Mary and Jesus, placed on either side of the the large circle. I then used my "Cropodile" to punch two holes in which to run ribbon through and tie the package together so that it will not open until ready for use.

The next project I did was the blue snow flake with the "Stampin-Up "City of David" stamped image on the large scalloped circle. I cut the card down two inches from 5 1/2" length to make it only 3 1/2" length. Then I measured and placed the scalloped cirle to reach the 5 1/2" length to properly fit in an envelope. I did not have the right blue for this project as I used 'Brocade Blue' (SU) ink when I needed a more 'Baby Blue' color to match the background scrapbook paper. So I enhanced it by chalking around the City and Words on the card and this helped me to be more satisfied overall with the card instead of focusing on the fact that I had the wrong blue. I am learning to broaden my horizon's when it comes to being perfect! LOL
Well enjoy. Happy Creating!

Newest Bellas


I haven't been producing too many cards lately... however I managed to make a few Bella's this week. "Merry Bella", "Gift-a-bella", and "Sista-bellas". I can't get enough "Bella" stamps - they are unique and fun. I love that I can stamp the image on scrap paper and cut out an outfit for the ladies. My girlfriend Nancy dropped off my 'Nestabilities' order of die cuts, and I was able to use the scalloped small circle die cuts for two of the Bella cards. What a great technique this is. Before they came along all I had was boring circles, now I have scalloped edges. I wish I would have purchased more though! I have been viewing many different cards using all sorts of 'Nestability' shapes and wished that I had them too! You can't get them all though! I love Christmas! I just don't like being sick during this season as I can't make and create all the cards I have wanted to - being in bed kind of limits one's crafting abilities.
Hopefully I am on the right medicine (after going on 6 weeks of Chronic Bronchitus) and I will be able to dig right in where I left off before I got sick. I finally figured out how to use my Flovent Disc (it's not just an easy inhaler these days - LOL), so at least it should be getting into my lungs the way it is supposed to.
Well happy creating! Enjoy these Bella's as I enjoyed making them!